TV WALL MOUNT INSTALLATION GUIDE
Tranquil Mount Model: TMO400A
Support 32″ to 50″ TV Screens
Load Capacity: 13.5-65 lbs (7~30 kg)

Compatibility Guide

TV VESA: 100x100mm, 200x100mm, 200x200mm, 200x300mm, 300x300mm, 400x200mm, and 400x400mm.

TV Weight (Without Stand): 7~30 kg [Once installed, Mount spring can be adjusted for the required weight]

TV Size: 32″ to 50″ (Recommend for LG TV models 32″ to 65″, use TMO400A))

Important Things to Note

  • Before any attempt on installation is done, the user should be able to read thoroughly and ensure that he or she understand the manual
  • Tranquil Mount Ltd will therefore not be liable in case of on any damage done to either the TV or the wall since the manual require the installation to be done by a qualified personnel
  • Serious damages on either the wall or the television may be encountered in case the manual is not followed to the latter. The manual provides correct procedures to be followed during installation to avoid any damages that may occur
  • Avoid your hands from moving back and forth in the bracket to prevent them from getting trapped and thus causing damages. Keep the product out of reach of children
  • The product should be installed by at least someone with a basic knowledge in the building construction and has a clear understanding of the instruction in the manual
  • With a maximum capacity of the wall bracket hitting a maximum of 32kg a weight above that may result in damages
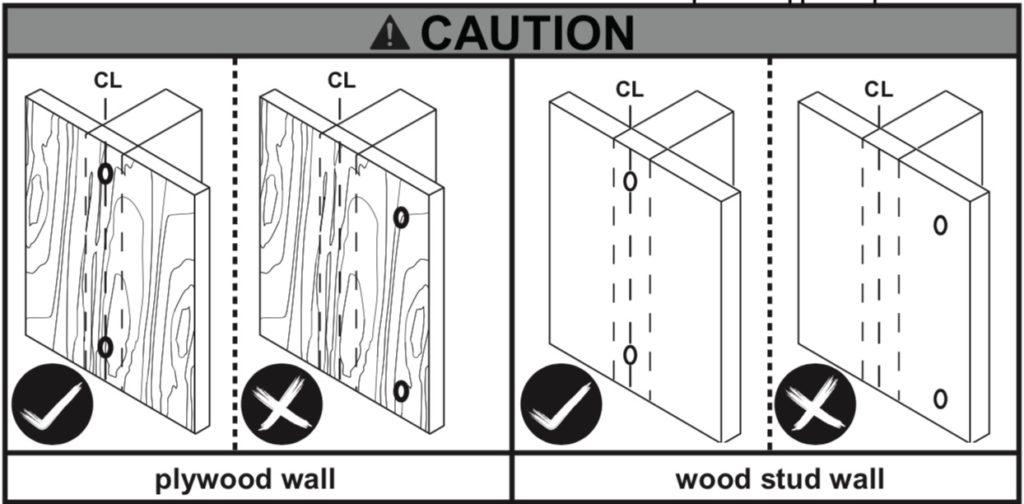
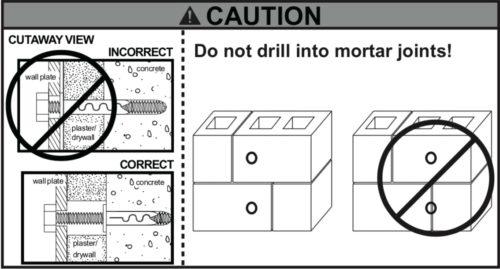
  • If mounting to a wall of wood stud construction, be sure that mounting bolt is anchored to the center of the stud, when installing the TV wall mount on a concrete wall, the wall must be at least 8″(203mm) thick with a minimum compressive strength of 2500 to 3000 psi (17.2 to 20.7 MPa), the concrete wall must meet ASTM C39. When installing the TV mount on a cinder block wall, the cinder blocks must meet ASTM C216 specifications and have a minimum nominal width of 8” (203mm). Be sure to mount in a solid part of the block, generally 1″(25 mm) minimum from the side of the block. Do not drill into mortar joints! If plaster/drywall is thicker than 16mm, custom fasteners must be supplied by the installer
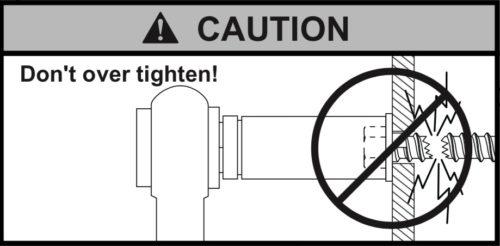
  • Ensure you receive assistance during installation i.e. in lifting the equipment and also tighten the screws but not over tightening.
  • Do not attempt to adjust the spring on the bracket (part FF) before mounting, read manual carefully. A replacement will be chargeable.

Ensure you have the following tools before installation

Screwdriverspencil, measuring rule, spanner, hammer, hacksaw
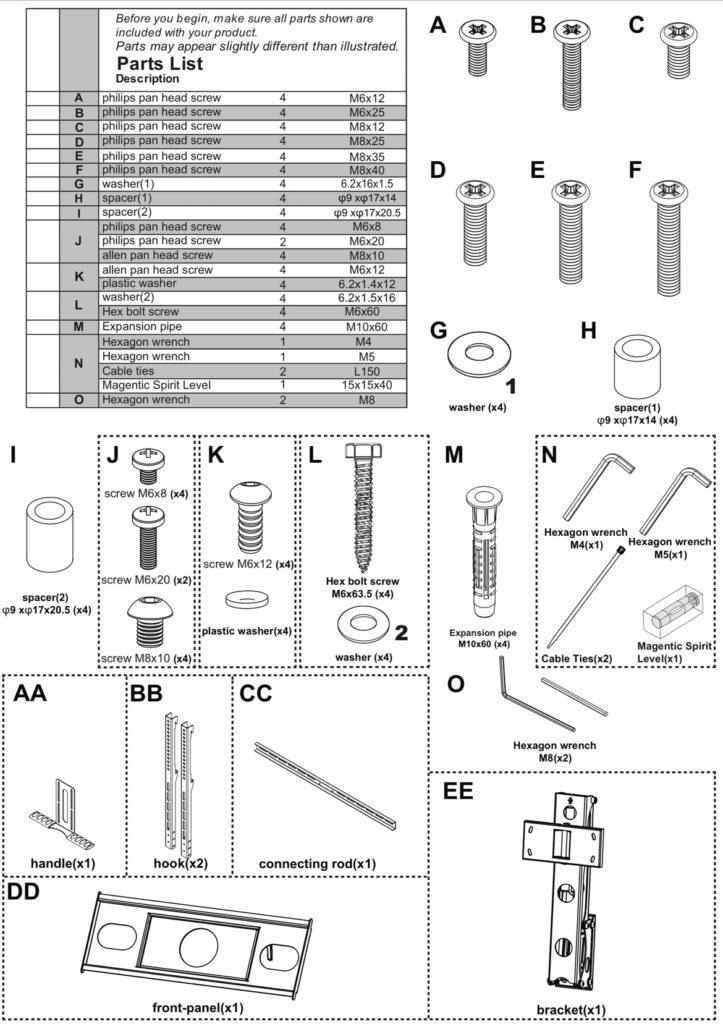
Ensure that all parts of the product are included in the product package

Installation requirements

  • This procedure requires at least two people in order to complete the task i.e. bracket installation. Ensure the supporting surface will be able to support the load that is going to a combined load of the equipment.
  • In case the equipment is installed next to the fireplace the maximum temperature should never exceed 110° F (43). It should also not be on when the fire is burning.
  • In case the mounting wall is made of wood, then it should include at least one studs. The covering wall should not be more than 16mm thick
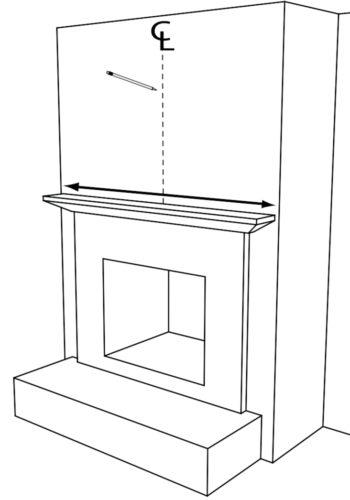
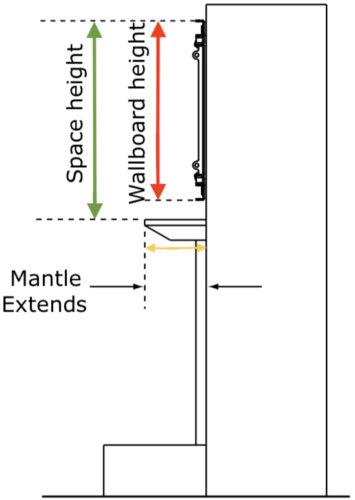
  • The mantle should never extend mounting surface in more than 350mm.
  • The weight of the television should be between 6 – 30kg and 32 to 65 inch which should be confirmed by the TV owner’s manual
  • The wallboard should be shorter compared to the space above the mantle. All this range depends on how far the mantle is extended


If mantle extends:Required space height:
Less than 180mmTV wallboard height plus 135mm
180 – 240mmTV wallboard height plus 150mm
240 – 300mmTV wallboard height plus 195mm
300 – 350mmTV wallboard height plus 265mm

Installation procedure

  1. Installing the TV wall mount bracket
  • Measure the centerline of the mantle and the area found and mark with a tape. It should be 600m above the fireplace.
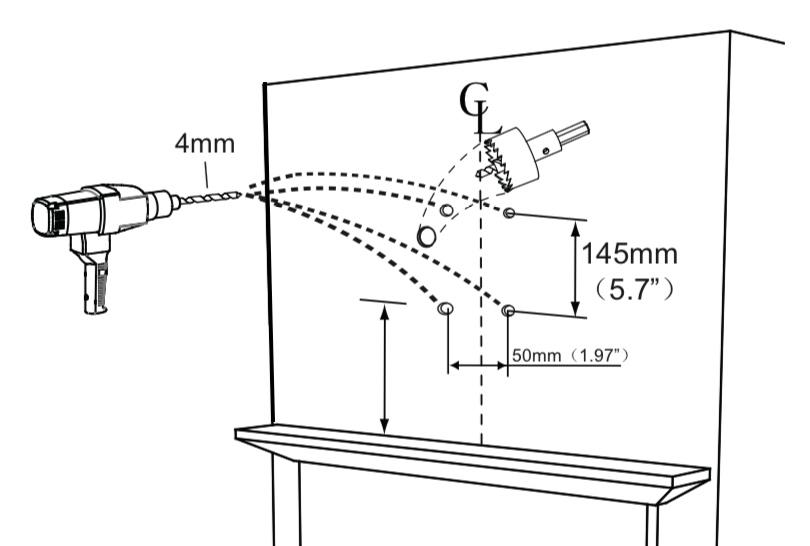
  • Plasterboard walls ONLY – Using the stud finder, locate at least two studs and finding their center using a sharp awl to locate each edge lag bolt should be installed in the center of the studs
  • Detach the plate from the arm, mark on the wall the install location. Use the supporting
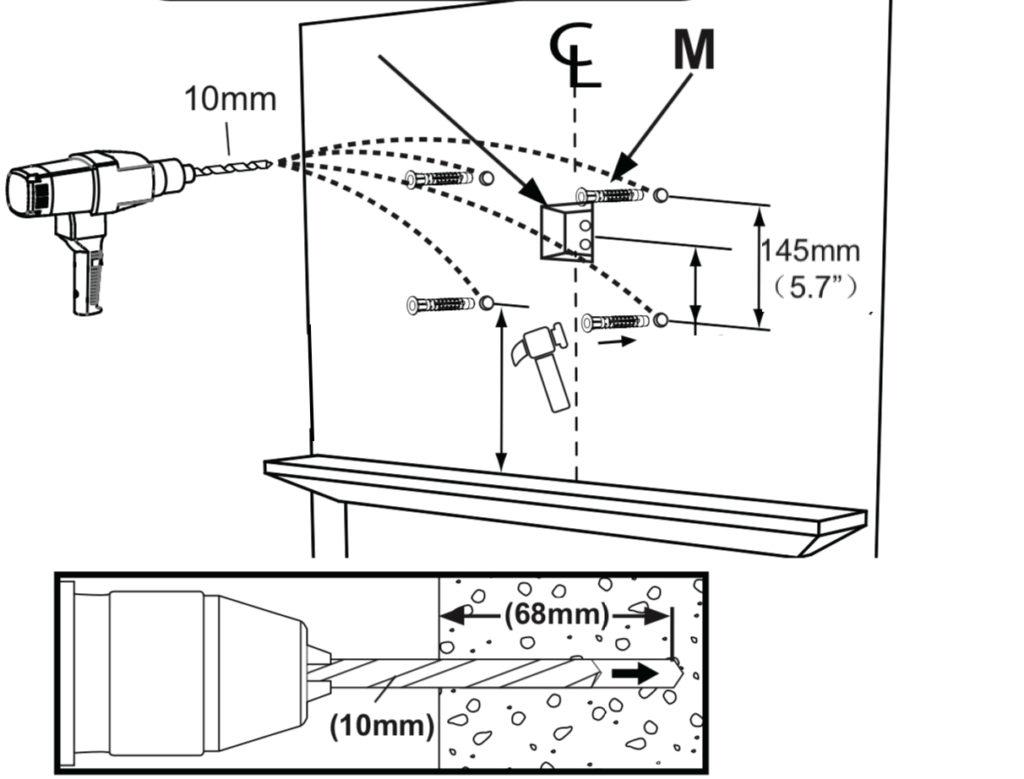
  • One should ensure there are no big deviations between the holes which need to be 10mm
  • In case the wall is concrete, use an expansion pipe. (In order to have a better installation, it is necessary to have in-wall wiring or wall AV and power plates installed to hide the cords behind the wall. We advise you get a professional installer to do this)

Plasterboard

Concrete

TIPs

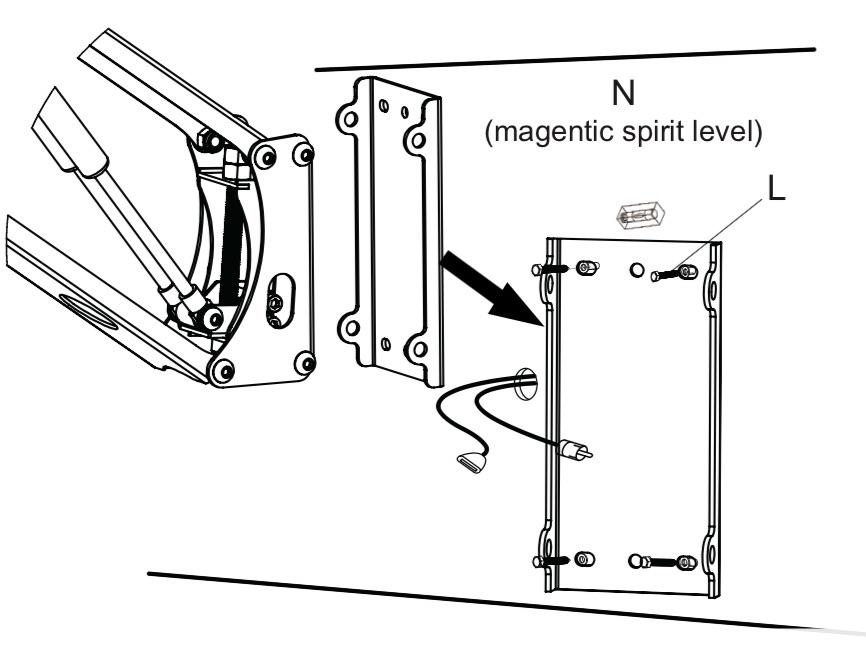
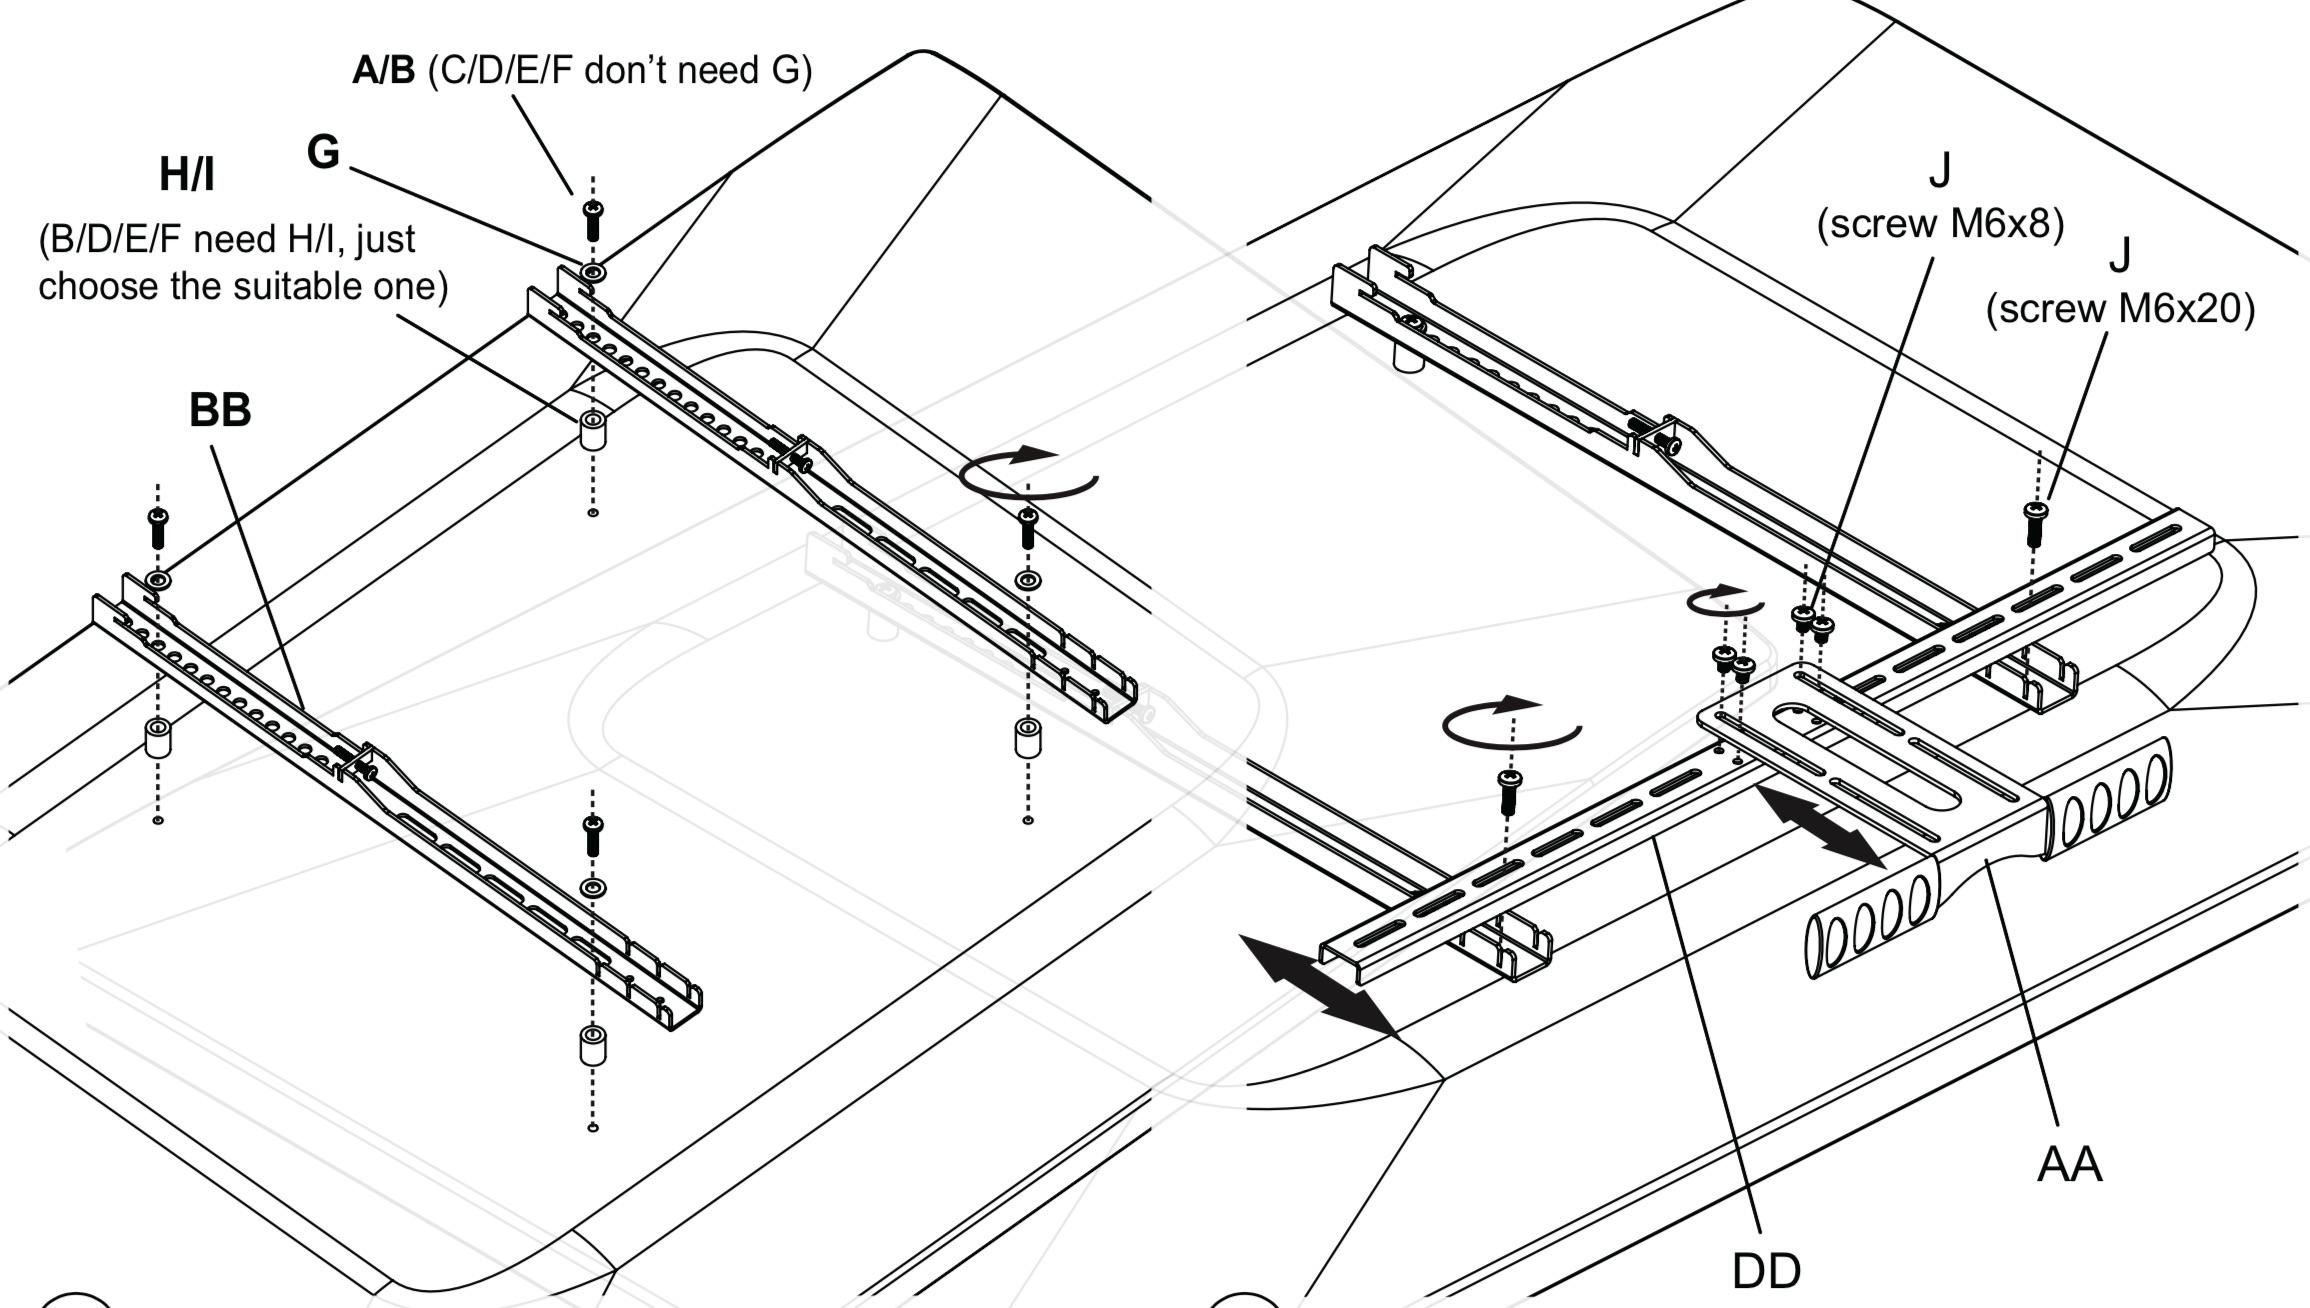
  • As illustrated take out wallboard, hex bolt screw and spanner from packaging and let the pre-set wire go through the hole
  • Take the nuts, front panel, bracket and spanner from installation to assist in installation

TIPs

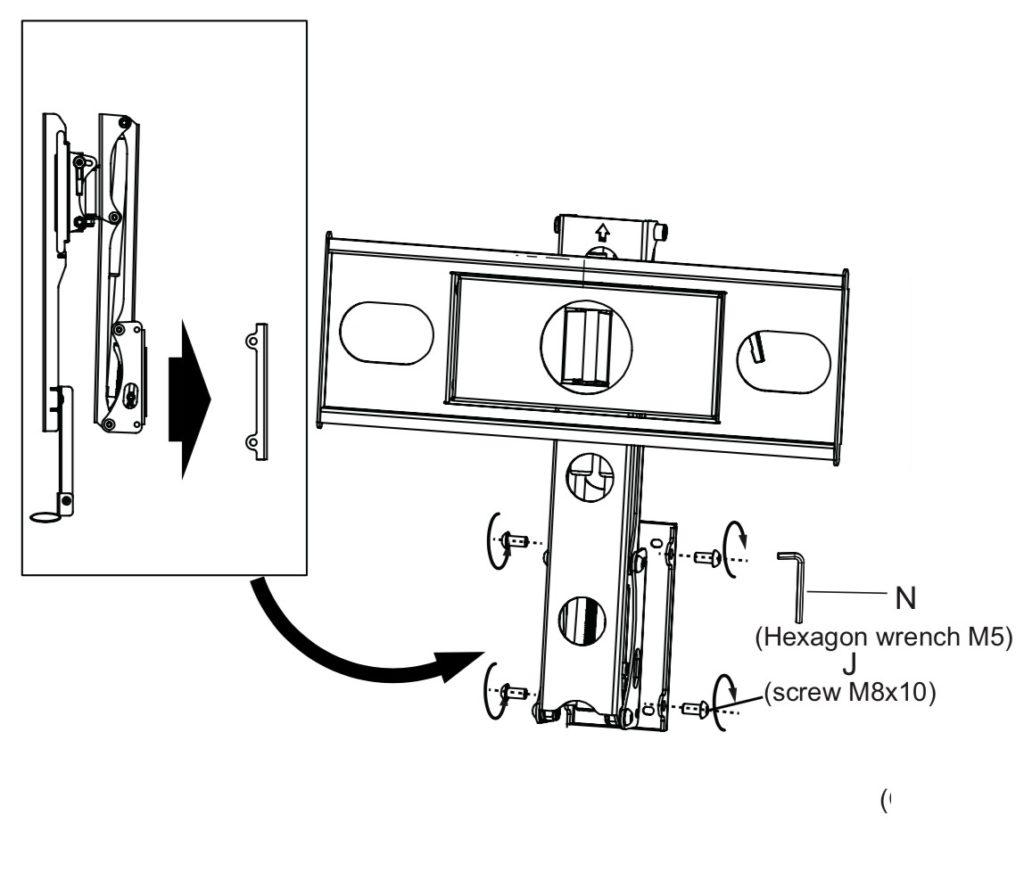
  • Finally taking out hexagon wrench from packaging lock the four head pan head screws (M8x10) with hexagon wrench use cable ties to up the wires.
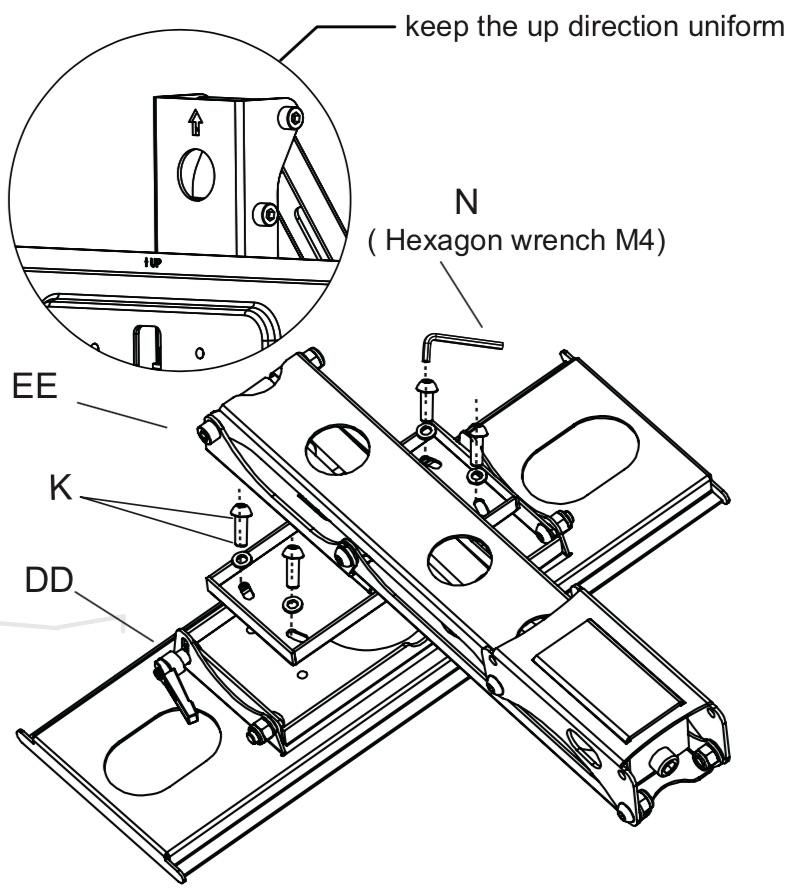
  • Take out K/EE/FF/N(spanner M10) from the packaging, installation as illustrated in the picture.

2. Installing the TV screen and adjusting the spring pressure

  • Do selection depending on the TV situation. Pan Head screw +washer; or pan head screw and washer and lock with cross screwdriver.
  • Take out Philips pan head screw, handle and connecting rod from the package in accordance with the TV set, adjust to the correct location and then lock with screw driver
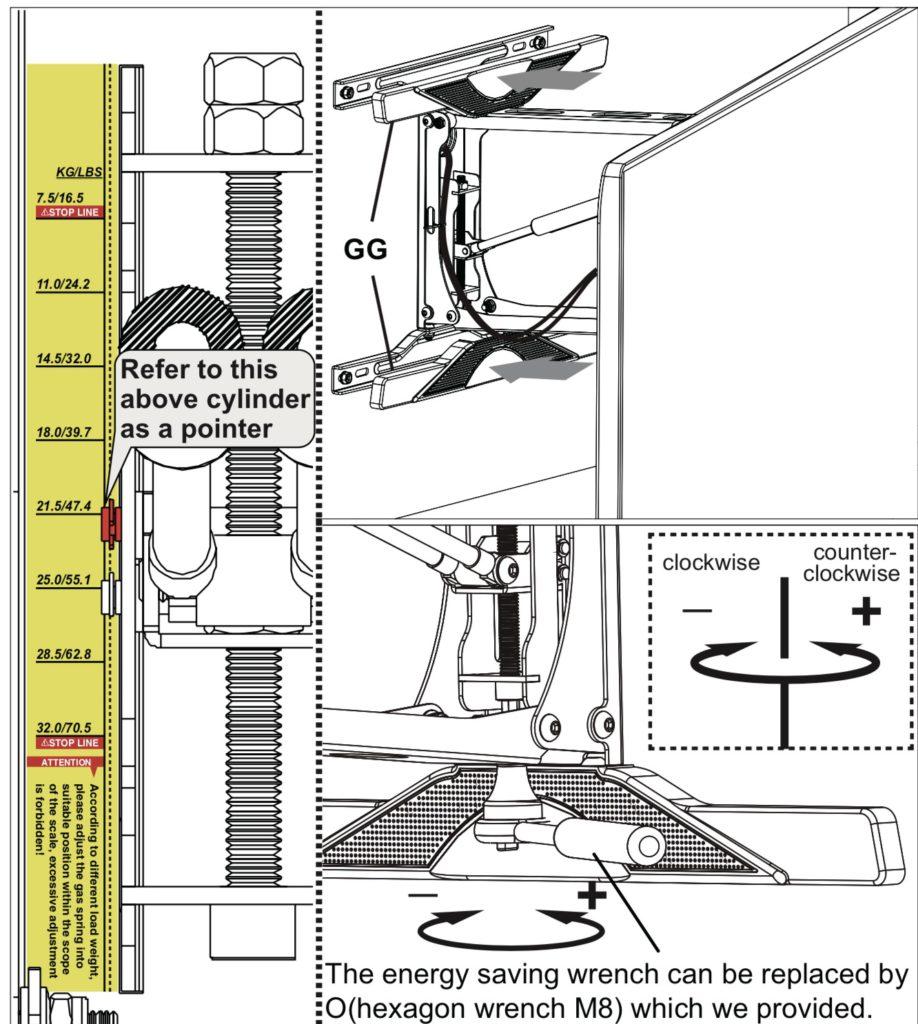
  • Adjust spring pressure to appropriate level (Check TV Manual for correct TV weight without stand) with energy saving wrench.
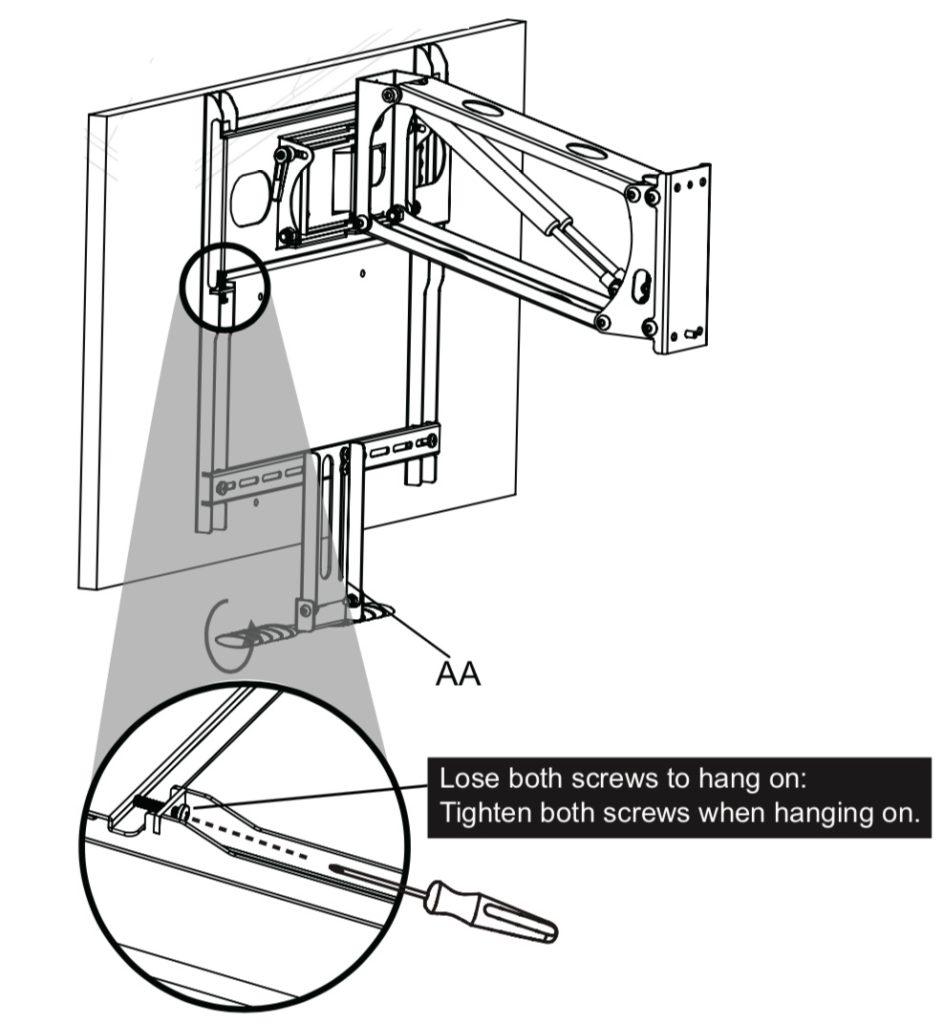
  • Lift the TV through hooks on the bracket and use a cross screw driver to lock the anti-off screws
  • Install the wall plate covers by clipping them onto the wall plate (They can be painted to the colour of the wall).

FAQ

Work out with the bottom of the television when mounting the TV wall mount above the fireplace.

This TV wall mount Installation guide

Wall bracket, which is the most important part of the Tranquil Mount

Bracket-rises and lowers the TV

The hooks, fitting rod

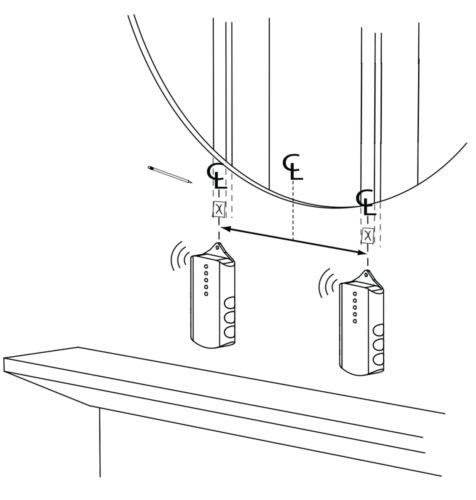
First mark the center line of the wall panel where the TV will be mounted on above the

Use the spirit level to mark the area of the wall bracket to find the center of the wall

Bottom of bracket should be 600 mtrs above the fireplace

Ensure the centerline is shown in the holes on the wall bracket

Put the spirit above on top of the wall bracket while holding it on the wall to ensure that you have 100% level

Also ensure the bottom is lined with the centre line initially drawn on the wall

When the spirit level is 100%, the centre line passes through the centre of the two holes of the wall bracket,

mark the mounting holes on the four corners of the wall bracket for your fixings

Use the 10mm plugs and the 10mm bolts supplied

For the concrete walls, you can drill the 8 mm holes and use the concrete nails

Drill the 10 mm holes first and then put the 10mm plugs

Mount the wall bracket and then insert the bolts; ensure that the centerline passes through the wall bracket holes before fixing the bolts

Join the bracket to the crosspiece and tighten using the small nuts provided

Use the small spanner provided to tighten the nuts joining the crosspiece and the bracket

Ensure the hook bars are not fixed below the TV

Use the washer and the nuts to screw the hook bars to the back of the TV

Also, ensure the screws at the back of the hook bars are undone for fixing the TV to the crossbar

Use the shorter screws to connect to the handle to the connecting rod already fixed to the hook bars

Slot the four mounting holes on the bracket to the bracket on the wall and the fix it in place with the screws that have been supplied in the box

The arrow written up on the cross bars confirm that the right connection has been realized

The calibration gauge for the television will give information on the adjustments to be made depending on the size of the TV

  1. The hooks on top of the hook bars are for hooking the TV to the bracket on the wall

Posted in Mount.
Add to cart